不想打公式 直接截图了(苦鲁西
代码 目录:/fairseq/models/transformer/
226行注册了transformer_model_architecture,可以自定义配置。
同文件22行注册了transformer。继承TransformerModelBase。
77行init,先从Config中读取配置,再从基类初始化,最后初始化参数args
1
2
3
4
def __init__ (self, args, encoder, decoder ):super ().__init__(cfg, encoder, decoder)
92行build_model主要是根据参数配置:
encoder decoder层的数量;
source和target的最大编码长度;
检查和设置共享嵌入
之后的方法都直接调用基类。
一些参数配置
forward中为整体的流程:调用encoder和decoder最后输出decoder_out
init中需要初始化一系列参数 比如embed_positions,layernorm_embedding等
build_encoder_layer建立encoder层发现要跳转道Transformer Encoder Layer Base
forward_embedding进行一系列嵌入(包括位置嵌入)
max_position为设置的最大输入长度
Encoder 在/fairseq/modules/transformer_layer.py
forward 首先设置注意力掩码
1
2
3
4
5
6
if attn_mask is not None :bool ), -1e8 if x.dtype == torch.float32 else -1e4
然后是自注意力层
1
2
3
4
5
6
7
8
9
10
if self.normalize_before:False ,
dropout正则化 防止过拟合
1 x = self.dropout_module(x)
Add & Norm层
Add层参考残差网络 防止退化
Norm层归一化
1 2 3 4 5 6 7 8 9 if not self.normalize_before:if self.normalize_before:
激活函数和全连接层
再做一次Add & Norm层
并返回结果
1
2
3
4
5
6
7
8
9
10
11
12
13
14
15
x = self.activation_fn(self.fc1(x))if not self.normalize_before:if self.return_fc and not torch.jit.is_scripting():return x, fc_resultreturn x
用到的一些函数如下:
全连接层 1 2 3 4 def build_fc2 (self, input_dim, output_dim, q_noise, qn_block_size ):return quant_noise(
自注意力层 1 2 3 4 5 6 7 8 9 10 def build_self_attention (self, embed_dim, cfg ):return MultiheadAttention(True ,
残差连接 1 2 def residual_connection (self, x, residual ):return residual + x
Decoder forward 先设置自注意力的状态和输入缓冲
1 2 3 4 5 6 7 8 9 10 11 if prev_self_attn_state is not None :2 ]Dict [str , Optional [Tensor]] = {"prev_key" : prev_key,"prev_value" : prev_value,if len (prev_self_attn_state) >= 3 :"prev_key_padding_mask" ] = prev_self_attn_state[2 ]assert incremental_state is not None
设置掩码
1 2 3 4 5 6 7 8 9 10 11 12 13 14 15 16 17 18 19 20 21 22 23 24 if self.cross_self_attention and not (is not None and _self_attn_input_buffer is not None and "prev_key" in _self_attn_input_bufferif self_attn_mask is not None :assert encoder_out is not None 0 ), encoder_out.size(0 )), self_attn_mask), dim=1 if self_attn_padding_mask is not None :if encoder_padding_mask is None :assert encoder_out is not None 1 ), encoder_out.size(0 )1 assert encoder_out is not None 0 )else :
自注意力
1 2 3 4 5 6 7 8 9 x, attn = self.self_attn(False ,
Add & Norm
1 2 3 4 x = self.dropout_module(x)if not self.normalize_before:
Encoder_attn层 也是多头自注意力但是输入是前一层的输出和Encoder的输出结合
1 2 3 4 5 6 7 8 9 10 11 12 13 14 15 16 17 18 19 20 21 22 23 24 25 if self.encoder_attn is not None and encoder_out is not None :if self.normalize_before:if prev_attn_state is not None :2 ]Dict [str , Optional [Tensor]] = {"prev_key" : prev_key,"prev_value" : prev_value,if len (prev_attn_state) >= 3 :"prev_key_padding_mask" ] = prev_attn_state[2 ]assert incremental_state is not None True ,or (not self.training and self.need_attn),
最后Add&Norm激活全连接归一化返回结果
Multi-Head Attention 在module的Multi-Head Attention中 太长了看不懂 先鸽了
题目 BPE BPE(Byte Pair Encoding)是字节对编码,在固定大小的 词表中实现可变长度的子词。将词分成单个字符,然后依次用另一个字符替换频率最高的一对字符,直到循环次数结束。
算法流程:
准备语料库 确定期望的subword词表大小等参数
在每个单词末尾添加后缀 统计词频 如“l o w”:5
将所有单词拆分成单个字符 用所有单个字符建立最初的词典 并统计单个字符的频率
挑出频次最高的符号对 比如t h组成th 将新字符加入词表 然后merge 将所有的t h变为th(有点类似哈夫曼树)
重复 上述操作 直到词表中单词数达到设定量或下一个最高频数为1 达到设定量后其余词汇直接丢弃
BPE可以有效地平衡词典大小和编码步骤数。
参考BPE 算法原理及使用指南【深入浅出】-CSDN博客
Embedding 1 2 3 4 5 6 7 8 9 10 11 12 13 14 15 16 17 18 19 20 21 22 23 24 25 26 27 28 class PositionalEncoding (nn.Module):def __init__ (self, d_model, dropout, max_len=5000 ):""" :param d_model: pe编码维度,一般与word embedding相同,方便相加 :param dropout: dorp out :param max_len: 语料库中最长句子的长度,即word embedding中的L """ super (PositionalEncoding, self).__init__()0 , max_len).unsqueeze(1 ) 1 )0 , d_model, 2 ) * 10000 **(2i/d_model)10000.0 ) / d_model))0 ::2 ] = torch.sin(position * div_term) 1 ::2 ] = torch.cos(position * div_term) 0 ) 'pe' , pe) def forward (self, x ):1 )],requires_grad=False ) return self.dropout(x)
Cross-attention和Self-attention的区别 Cross-attention也就是代码中的encoder-decoder-attention
1 2 3 4 5 6 7 8 9 10 11 12 13 14 15 16 17 18 19 20 21 22 23 if self.self_attention:elif self.encoder_decoder_attention:if key is None :assert value is None None else :if self.beam_size > 1 and bsz == key.size(1 ):0 ), -1 , self.beam_size, key.size(2 ))[0 , :if key_padding_mask is not None :1 , self.beam_size, key_padding_mask.size(1 )0 , :]
交叉注意力用于decoder中使其当前状态和encoder的output交互。decoder作为Q encoder_output为K、V
BLEU指标 N-gram BLEU指标采用N-gram的匹配机制,就是比较译文和参考译文之间n组词之间相似的一个占比。
译文分为4个3-gram词组 有2个命中参考译文 则该译文的3-gram匹配度为2/4
召回率 机器译文:the the the the
人工译文:The cat is standing on the ground
1-gram的匹配度为1但是the在参考译文只出现了2次,如果匹配度直接用1很显然是不合理的。
$Count_{clip}=min(Count,Max_Ref_Count)$前者为译文中出现的次数,后者为参考译文中的最大次数,取最小值限制上文的情况(即最多不超过参考译文中该单词的频率)
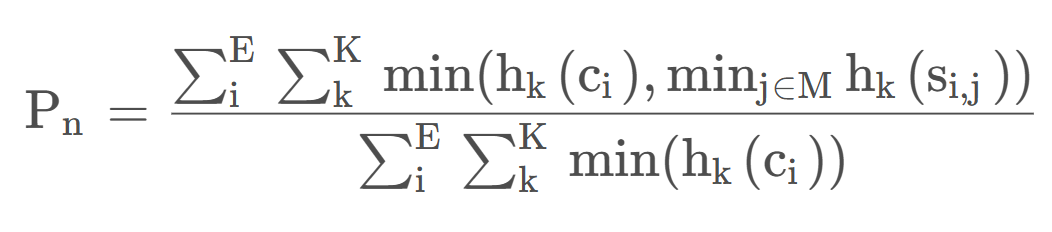
计算每个N-gram的公式如下:
人工译文$s_j$
机器译文$c_i$
$h_k(c_i)$表示第k个词组在翻译译文$c_i$出现的次数
$h_k(s_{i,j})$表示第k个词组在标准答案$s_{i,j}$出现的次数$
惩罚因子 N-gram的匹配度可能会随着句子长度变短而变好,因此会存在一个问题,一个翻译引擎只翻译出部分句子且比较准确,那么匹配度依然很高。因此要引入长度惩罚因子
$l_c$代表机器译文的长度
$l_s$代表参考译文的有效长度
当机器译文较长的时候不惩罚
最终公式
BLEU采用均匀加权 $W_n=1/N$
N最大为4 即最多4-gram
参考caBLEU算法(例子和公式解释)-CSDN博客
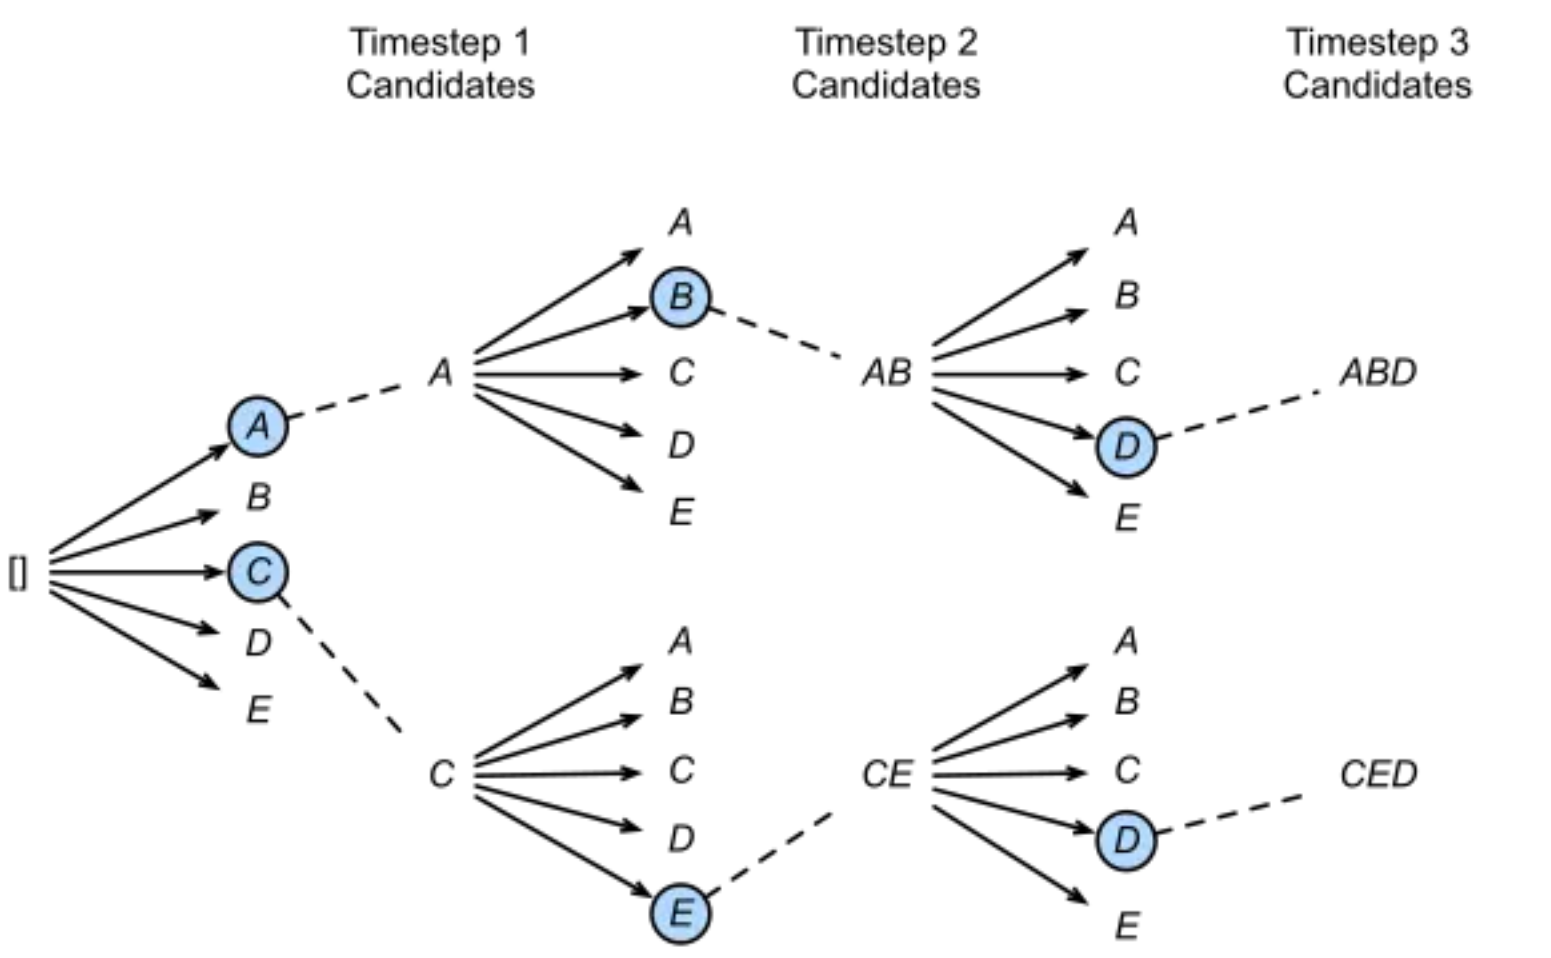
beam Beam Search
Greedy Search问题在于在每一步它只选择得分最高的top 1单词,假设被它忽略的top 2单词带来的后面一系列单词使得整个序列的得分反而更高,则Greedy Search就不会得到最合理的解码结果。越大搜索结果越接近最优,但是搜索的复杂度也越高 ,当Beam Size等于1的时候,Beam Search退化为Greedy Search。
Beam Search单条候选序列停止条件细分有两种情况,分别是
候选序列解码到停止
早停,候选序列得分已经低于已解码完的当前最优序列
运行
首先配置环境、下载fairseq
1 2 3 4 5 conda create -n {YOUR_ENV_NAME} python=3 .9 cd fairseq
下载数据并预处理 注意bash命令需要在git bash中找到对应的目录运行,遇到了下载失败的问题,解决方案
1 2 3 4 cd examples/translation/cd ../..
数据下载完成后 使用如下命令进行数据处理,要将$TEXT替换为TEXT的值
1 2 TEXT=examples/translation/iwslt14.tokenized.de-en
为了节省时间,只抽取两千数据训练。然后运行下列命令进行训练
注意用set命令设置CUDA
1 2 set CUDA_VISIBLE_DEVICES=0 0 .9 , 0 .98 )" --clip-norm 0 .0 --lr 5 e-4 --lr-scheduler inverse_sqrt --warmup-updates 4000 --dropout 0 .3 --weight-decay 0 .0001 --max-tokens 4096 --eval-bleu --eval-bleu-args "{\"beam\": 5 , \"max_len_a\": 1 .2 , \"max_len_b\": 10 }" --eval-bleu-detok moses --eval-bleu-remove-bpe --eval-bleu-print -samples --best-checkpoint-metric bleu --maximize-best-checkpoint-metric
遇到了Cython组件出错的问题,解决方案
进行推理
1 fairseq-generate data-bin/iwslt14.tokenized.de-en --path checkpoints/checkpoint_best.pt --batch-size 128 --beam 5 --remove-bpe
遇到了Mask类型未定义问题,解决方案
得到结果
BLEU4为得分
问题解决 bash命令的问题 wget无法使用,通过下文下载:【Git】解决Git Bash无法使用tree、zip、wget等命令_git bash zip-CSDN博客
修改prepare-iwslt14.sh,运行后可以正常下载数据。
6-10 13-17有添加 46有修改
1 2 3 4 5 6 7 8 9 10 11 12 13 14 15 16 17 18 19 20 21 22 23 24 25 26 27 28 29 30 31 32 33 34 35 36 37 38 39 40 41 42 43 44 45 46 echo 'Cloning Moses github repository (for tokenization scripts)...' if [ ! -d "mosesdecoder" ]; then clone https://github.com/moses-smt/mosesdecoder.gitelse echo "Moses directory already exists. Skipping clone." fi echo 'Cloning Subword NMT repository (for BPE pre-processing)...' if [ ! -d "subword-nmt" ]; then clone https://github.com/rsennrich/subword-nmt.gitelse echo "Subword NMT directory already exists. Skipping clone." fi $SCRIPTS /tokenizer/tokenizer.perl$SCRIPTS /tokenizer/lowercase.perl$SCRIPTS /training/clean-corpus-n.perl"http://dl.fbaipublicfiles.com/fairseq/data/iwslt14/de-en.tgz" if [ ! -d "$SCRIPTS " ]; then echo "Please set SCRIPTS variable correctly to point to Moses scripts." exit fi $prep /tmpmkdir -p $orig $tmp $prep echo "Downloading data from ${URL} ..." cd $orig "$URL " -O $GZ
Cython问题 1 2 3 4 # 无法调用numpyImportError: numpy.core.multiarray failed to import (auto -generated because you didn 't call 'numpy.import_array ()' after cimporting numpy ; use '<void >numpy._import_array ' to disable if you are certain you don 't need it ). # cython 组件出错 ImportError : Please build Cython components with : python setup.py build_ext --inplace
解决方案
1 2 3 pip install path /to /fairseq
同时在\fairseq\fairseq\data\data_utils_fast.pyx中添加手动引用np
1 2 cimport numpy as np
Mask类型定义问题 关键报错如下:
1 2 3 File "D:\a naconda3\e nvs\t ransformer\lib\site-packages\f airseq\modules\t ransformer_layer.py" , line 319 , in forwardoutput = torch ._transformer_encoder_layer_fwd (RuntimeError : Mask Type should be defined
解决方法
找到\anaconda3\envs\transformer\lib\site-packages\fairseq\modules\transformer_layer.py
在forward中加入
1 self.can_use_fastpath=False
有点作弊的方法,如果有其他方法不建议使用这个。但是在google colab上可以正常运行,本地可能是环境的问题。
然后又遇到了输出的类型不对的问题
1 AssertionError : expecting key_padding_mask shape of (5 , 128 ), but got torch.Size([128 , 5 ])
解决方法 在self.can_use_fastpath=False之后 会转到else中运行,在else中加入
1 2 if encoder_padding_mask is not None and encoder_padding_mask.shape != (x.size(1 ), x.size(0 )):0 , 1 )